Thursday, November 15, 2012

Creative Kissing.... With Stamps of course!!!


Learn how to kiss… with stamps! In one easy technique you can create a clever, unique design on your stamp image for a more customized look. Let us show you how!


So go ahead, start KISSING wit your products you already have NOW! ;)
 

Wednesday, November 14, 2012

Pear & Partridge .... In a Pear Tree... No! In A Scrapbook

Re-live those magical moments with this festive workshop layout!


Use the materials and instructions in this kit to create six beautiful 2-page layouts; then use your remaining supplies along with a few additional items to make the bonus project!
 
This workshop project is ideal for creating those pages that will capture the spirit of Christmas in your scrapbooking pages as well as in your heart. The look of your children's faces, the feeling of your loved ones by your side on this wonderful holiday season. 
 
Join Me :
 November 25th 2012
1:00 p.m.
Cost: $34.50 (plus $ 6.85 for the Dimensional Elements Also)
R.S.V.P. to: rcross2823@gmail.com or 419-277-7576


Z1772  Dimensional Elements In Color - Holiday
G 1052 Workshop on the Go Pear & Partridge Scrapooking Kit

Tuesday, November 13, 2012

Capture The Date, Capture The Savings


In November, you’ll get something extra when you buy the Stamp of the Month—50% off another stamp set! When you qualify for and buy the November Stamp of the Month set, Capture the Date, you’ll receive another stamp set* of your choice for 50% off—it’s like two promotions in one!
The versatile Capture the Date stamp set is great for any layout, card, invitation, or calendar, and now you can choose another stamp set at half-off for more wonderful papercrafting.
Get Capture the Date and then capture the savings today!
 
Make sure to stop by and shop all the While Supplies Last Items on my website & they qualify too ! Up to 75% off items that you thought "disappeared" !!! Woohoo - but don't wait to long, they will surely be gone if you wait! Go ahead, buy yourself, your spouse, friend, or neighbor those discounted items, Christmas IS right around the corner! :)
Happy Shopping!

Tuesday, October 23, 2012

A Gift for You....

This is a gift that I made for a dear friend of mine tonight,
 
I used the Artiste Cricut Cartridge page 74:


I also used the flower on page 54 with a cute tag, 
 
Clementine X7156B and Kraft Paper
 with some


to glitz up the flowers!
 
I hope this is just the "perfect gift" for her & a cute way to show you how to
Bling up your projects for the holiday season coming up!
 

Sunday, October 21, 2012

Monogrammed Stationary Class


Monogram Stationary Class


Using Close to my Heart's La Belle Vie, Avonlea and Flirty Collections, we will create 3 sets of personalized stationery (4 cards each). Your kit will also come with the new Perfect Fit - Frames stamp set and mini monogram initial stamp of your choice, both of which coordinate perfectly with the Cricut Art Philosophy Cartridge.
 
  This would be a great way to give a perfect Christmas Present to that hard to buy for person, teacher or MALE teacher.

 
The project kit is $28 (plus tax & shipping) and includes all of the following: 
  • (12) 4-1/4" x 5-1/2" Colonial White Cards/Envelopes
  • D1527 Perfect Fit - Frames stamp set
  • Monogram stamp of your choice
  • La Belle Vie, Avonlea and Flirty Collections & coordinating cardstock
  • (12) Pre-cut frame shapes
  • 30" of Dark Chocolate Striped Ribbon & (3) Magazine Shaped Boxes for gift giving.
Add the 1-1/4" circle punch for only $12 more!
Purchase additional Monograms for $2.95 each!

 
Other supplies, not included, needed to complete the project:
        Inspired by Lisa Stenz / Melisa Laverty    


Thursday, October 18, 2012

Catch my party ... AT HOME!

If you missed my card workshop last Monday please don't be disappointed, I have great news for you! Watch the video below to see how easy it can be for you to just do it at home !

 
Still feel overwhelmed?
 That's ok too, CALL me 419-277-7576
and I will PRE-MAKE your Christmas cards and ship them right to you ALL DONE
 & you can still send out handmade cards...
 
But hurry, I know we don't want to think about it, but Christmas IS
right around the corner!
BOO !
 
Order From HERE now to get started on your homemade card needs today!

Sunday, October 14, 2012

Studio J Tricks to Add Flair To Your Layouts

Even though Studio J® is fast and easy to use, it is helpful to know some great tricks that can make customizing your layouts even more exciting. Here are some Studio J tricks straight from our professional Close To My Heart artists:

1. Customize your background and texture paper. You can change the color and intensity of the background and texture paper included in whichever kit you choose. Simply select the piece of background and texture paper, change the color in the color selection tool, and increase or decrease the intensity of the color in that same popup box.

2. Crop My Stickease® quotes, titles, and tags. The cropping feature on the My Stickease images allows you to select a section of a quote, title, or tag to use as a border or other embellishment.

3. Create a customized My Stickease image. If you have a specific image in mind to use as an embellishment on your page, you can create a customized My Stickease to fit your theme perfectly. Simply add a text box, photo hanger, ribbon, ribbon slides, and Stickease to create the little suitcase! So easy! Be sure to crop or send elements behind other elements when necessary, and add several elements together for a unique look!


4. Select more than one element at a time. If you want to move several elements of your layout at once, simply click and drag your mouse around the elements you would like to select. Let’s take buttons, for example. After the buttons have been selected, you can click the icons in the popup box to choose to align the buttons vertically or horizontally if you desire.

5. Make faux washi tape with vellum text boxes. To create the look of a piece of clear washi tape, make a small rectangular text box, filled with vellum background (this is the default color for text boxes). You can make the tape strips as large or small as you want, or even layer them for more emphasis.


6. Stretch one photo across multiple photo wells. If you have fewer photos than photo wells, instead of deleting the excess wells, try scaling the picture to a larger size and then copying the picture to other photo wells and matching the photos up until they align with an almost seamless image. This trick works best with photo wells that are adjacent to each other.

7. Create ruffled ribbon. Select “Ribbons” in the drop-down menu under the Embellishments toolset. Choose ribbon tab and rotate the tab so that it is vertical on the page. Then layer several tabs on top of one another, sending every other one to the back to create a ruffled look.


8. Create a jagged border with text boxes. You can create a jagged border simply by rotating multiple text boxes about 45 degrees and making them the same color as the background. Put these boxes on top of a long, rectangular box of another color, and you’ve got a jagged border!


9. Change the background of your layout. Sometimes you may like the photo and journal arrangement in a layout, and yet want to change the background colors. Because photos sit on top of everything else, this is easy to do. Simply pull a journaling box over the space you want for a different background and fill it with a color from the color selection tool or a patterned paper from the Papers toolset. Then, send it backwards until the photo wells are on top of your new background.

Bonus Trick! Use keyboard keys to make embellishments. Did you know that some of the best tools for creating custom embellishments are the basic keys on your keyboard? It’s as simple as typing into a journaling box with no background color. Use periods to make a polka dot pattern, angle brackets to create a trendy Chevron look, overlapping pound signs to make burlap, question marks to make rope, and so much more!


 Try these tricks on your own Studio J® layouts. October is the perfect month to give it a go because for every 9 layouts you create, you’ll get a 10th layout for FREE! !!

 Click HERE to get started TODAY!!!!

Thursday, October 11, 2012

A Star... This Way.. That Way.. .Anyway You Want


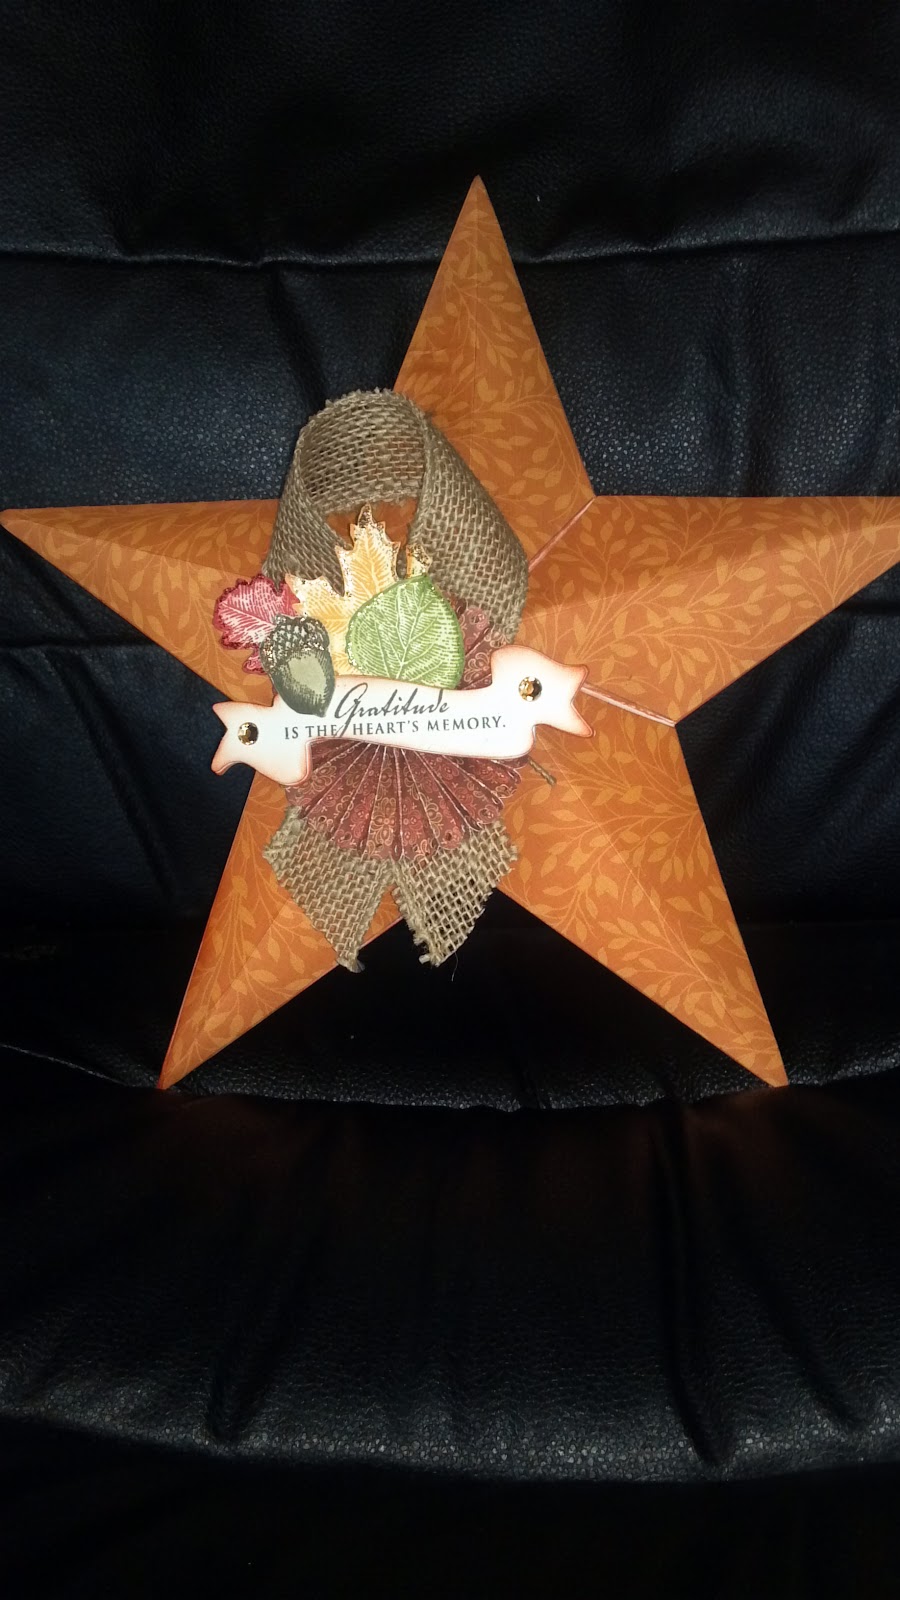
I’m talking about the wonderful My Creations Star from Close To My Heart!

This beauty is a must-have for your décor, bringing dimension and appealing angles to all sorts of flat surfaces near you. One ideal use for this sturdy chipboard shape is as a light-weight seasonal door-hanger that you can hang without worrying about putting scuffs on your door. I was so excited to be able to make a sample with one of mine that I purchased!

Take a look:
 This is my finished star! I used the following supplies to complete my My Creations Star!
I will give you more up close photo's too! How about you! Are you ready to be... I mean... decorate... I mean gift... I mean KEEP or all the above My Creations Star?
(See Workshop Information Below! )
 
 X7160B Flirty Paper Packet
D1519 Abundance
C1504 Fall Harvest
Z1760 Burlap Ribbon
Z1792 Awards Dimensional Elements
Z1753 Brown & Tan Assortment Sparkles
& Assorted Glitz Glitter Gels

 
These aren't just made for being Thankful, but here are some more ideas
that you can use in the creations of your own My Creations Star!
See Close To My Heart's creations!


 SO Join Me Today & Sign up for your November Workshop - or choose a date that works for you & I will come to YOU!
 Make your own Creations - You Pick your Paper &  Embellishments :
 
Cost: For One Star: $25.00      
            Includes:                                                                                           
                                       (1)               My Creations Star
(1/2)     Paper Packet of your Choice
(1)               Glitz Glitter Gel of your choice
(1)               Sparkles of your Choice
 
For (2) Stars : $40.00
Includes:
(2)              My Creations Star
(1)        Paper Packet of your Choice
(2)              Glitz Glitter Gel of your choice
(2)              Sparkles of your Choice
For (3) Stars: $ 53.00
Includes:
(3)              My Creations Star
(1 )      Paper Packet of your Choice
(3)              Glitz Glitter Gel of your choice
(3)              Sparkles of your Choice
 
When: November 12, 2012 (or date of your choice)
Where:  LaPointe Methodist Church
Time:  6:00 p.m.
R.S.V.P. :
By: November 2nd, 2012
Rebecca Cross
419-277-7576 or


Tuesday, October 2, 2012

You Won't Want To Miss This


Save with Studio J®!

October 2012 Constant Campaign


Get a free Studio J® layout in October! In this special promotion, you will receive a free custom-printed layout when you buy 9 custom-printed Studio J layouts. To receive the discount, just add 10 or more layouts to your cart. You’ll see a discount reflected in your order total. And you can totally take advantage of this promotion by ordering in multiples of 10. Buy 9, get 1 free. Buy 18, get 2 free. Buy 27, get 3 free. Up to 4 free layouts! It’s a great time to use any Member Bonus layouts you may have. If you haven’t tried Studio J yet, now is the time to start!
 
Visit : My Website today
& click on the Studio J tab on the left to get started!
Watch the video below to help you get started!


Monday, October 1, 2012

October Stamp of the Month

October Stamp of the Month Artwork


Very Merry Christmas SET OF 11
Available October 1–31, 2012

Get the Stamp of the Month set for just $5 (S1210A) when you place an order of $50 or more in products. Jump-start the fun by ordering the items from the list below to create this artwork!  


Scholastic Paper Packet($9.95, X7159B, Autumn/Winter 2012 Idea Book p. 44)

Olive Cardstock($14.50, 1245, p. 9)

Silver Shimmer Trim($4.95, Z1799, p. 124)

Festive Velvet Rub-Ons($4.95, Z1743, p. 126)

Sparkles Black & Grey Assortment($2.95, Z1754, p. 127)

Cricut

® Artiste Collection($99, Z1790, p. 15)

RECOMMENDED BLOCKS: 1” μ 3½” (Y1002), 2” μ 2” (Y1003), 3” μ 3” (Y1006)

Contact me today: 419-277-7576
or email me: rcross2823@gmail.com

Sign up for one of my upcoming workshops to help you with your order!


Wednesday, August 8, 2012

FREE! Did You Say FREE ???

This is the Cutest BAG EVER !!! You can get yours TODAY for FREE on my WEBSITE by just purchasing the $49 kit and NO OBLIGATIONS! Figure out you LOVE THE PRODUCT! That's okay too, purchase as much as you want with a 22 % discount!!! Please feel free to share this with ALL your friends! And don't miss out ! They are going FAST!

Tuesday, June 12, 2012

5 Minutes > One Stamp Set = Beautiful Card !


Create a finished card in five seconds flat with the new series of single-image A-size My Acrylix® stamp sets from Close To My Heart. Use them for quick scrapbook layout titles or easy, one-step cardmaking. Each one is designed to complete your project with a single stamp, and at just $6.95 each, these stamps are super affordable!

And this month, they are even MORE affordable! During the month of June, for every 2 stamp sets you purchase, you get a third one of equal or lesser value for FREE! Now is the time to stock up!

Watch here to see the beautiful Kristine show us today !

Then visit my WEBSITE HERE to get started on your shopping today! 

Sunday, June 3, 2012

June Stamp of the Month - Life Is Tweet

Since I have been a busy mama I am going to feature my fellow CTMH consultant's on my blog for their amazing work on the June Stamp of the Month! I just can't resist all their beautiful artwork & not share it with my amazing Peeps (YOU) !!! :) Enjoy !!


To get the June Stamp of the Month for yourself, go ahead, Buy 2 Stamp Sets, get one FREE & then get the June Stamp of the Month for only $5 !!! Wow! What a Steal!!! :)


Thank you Vicki For letting us see your beautiful artwork as always!! :) You can go to her website for wonderful ideas for everything! :)


I love Jen Rubio's artwork !! Simple, little paper used and lots of stamp sets used !!! :)

Thank you ladies for allowing me to feature you on my blog !! :)


STAMPAGANZA IS BACK!!!
What a great time to buy stamps!
During the month of June, when you buy 2 stamp sets, you get one FREE.
Here's the details:
  • Purchase any 2 stamp sets (sized A, B, C, D, or E) at full retail price and receive a 3rd stamp set of your choice FREE (of equal or lesser value) - a savings of up to $29.95!
  • Stamp sets that count toward the qualifying purchase include full-priced A, B, C, D, and E sets only. Stamps that do not count toward a qualifying purchase include customizable (K), Workshops on the Go, Cricut collection, and Stamp of the Month (both discounted and full-priced) sets.
  • No quantity limits! For every 2 you buy, you get 1 FREE (keep in mind that it is the lowest priced stamps that you will get for free).
  • No tax on your free stamps, but shipping applies.
  • Available only from June 1st - June 30th. Visit my website Here now to get started on your shopping trip!!! 

Tuesday, May 22, 2012

Building my Business....

When Jim & I first married, we moved to Port Clinton & I didn't know anyone... I thought it would be great to get out there and meet people but I just didn't know how.. or where .... so I went to a local library where they had free classes on how to make Christmas cards !
 Wow, did I realize, I COULD DO THIS!!
So, I walked up to instructor, asked her how I could learn more, she was so busy that she gave me her card & phone number and told me to call her. So, I went home and looked up "Close To My Heart" ... boy, was I in trouble... all this awesome looking product that looked so EASY to do!

How could I resist, so there I was, never made a handmade thing in my life before I made free cards at the library, with a $199 kit & lots of gizmo's I had no idea how to use!

I had a home party, invited the neighbor who then invited everyone I didn't know & that was the start of something that is my "love" & my "passion" today! & don't need to say more than when I say my Closest, dearest, & most thoughtful friends I have gained from CTMH .... I never would of dreamed that this would someday be "MY DREAM JOB" !!!

This was my "workspace", class space & lots of friends & customers shared memories together scrapbooking many pages & cards together! Aren't those cabinets BEAUTIFUL ! But wait, there's more!

This is the view from the other side of the room, I need to look for an upclose picture of the paper cabinet, you would be in Heaven!!

I am so happy that I was able to re-vamp this gross basement into a finished living / working space for me & my customers, this was my "home away from home" .... it always had projects waiting for me & leaves behind lots of great memories of my customers, friends, business I built and most of all the "dream job" I get to take with me!!!

Monday, May 14, 2012

The last 21 days....

The last 21 days have whizzed by like a tornado, exactly what I felt like I was in too! I had emotions that were happy, sad, trying & exhausting. But I am glad to see myself in "another state" of mind too. Refreshed, starting a new (for the time being) & I want to share with you what I have been up too.

You all know that I have moved & I want to share this with you. If you have ever moved from a home you will understand the emotions that I have been through, and each picture I will tell you a memory that I have associated with that picture.  Even though this home is made of concrete, sticks, morter, & roofing, the memories inside are priceless. Just like the song Miranda Lambert says, "The home that built me" ...............

This is a picture of the outside of our house on the day we put it on the market.  This is the 3rd house my husband ( boyfriend at the time) drove up too 10 years ago looking for somewhere to call home. Even though it didn't look like this,
I remember thinking this is somewhere I can "grow" into and start a life with my soon-to-be- husband.
We purchased the house in June 2002 & then shared the next year making it a home before marrying in October 2003.

I think this is the 3 car garage that attracted
my husband to purchase this home.


This is the kitchen that I cooked many meals to my husband and family, always trying new recipes, burning things because I forgot about them, (don't act like you've never done this), cutting my finger to the bone, baking his favorite apple pie, or cooking a roast in the crockpot, & then eventually installing a dishwasher due to too many bottles !!! This kitchen has gone through alot of changes in the 10 years we lived here, but also has many memories of learning lots of things about my husband's cooking (and cleaning) abilities & most importantly the recipe of love !!


And this is the place my family broke bread. We are a traditional in the way that we always ate at the table, & almost always ate together if Jim (my husband) was home. This is where my kids ate their first meals, made messes, spills, thew food when they were mad & also, in the corner is where I remember Isabella taking her first steps when she was just shy of being a year old.


This is the living room that my family shared lots and lots of memories, sleeping on the couch when I first brought both kids home, kids played with their toys, opening presents on Christmas morning, birthday presents on birthdays, having extended family share laughter, tears, & this is the place my husband and I always resorted too in the evening for our 1 hour television shows cuddling on the couch for our snuggle time. ( Before falling asleep on the couch !!) 
AH! This is the ONE BATHROOM that our family shared! We gave our kids their first baths in this tub, & sometimes while one of us is giving kids baths, one of us would be getting ready, while another one would be using the toilet... NOT ALOT OF ROOM! I can't wait until we have one more bathroom (atleast ) LOL!
This was my"our" bedroom, lots of memories... lol ... we will just keep it at that! Ha!

This was my daughter Isabella's room ... until Isaiah came along... then, both of my kids slept in here. Yes, I made them share a room upstairs because our room was upstairs so I didn't want anyone downstairs in the spare room. ( fret of fires etc ) lol... but I think I may have spent a few nights in here too... spending time with a sick kid, or colic kid in Isaiah's case... hmmm the memories...
And this was the "spare" kids toy / guest room that my daughter played in.  While Isaiah's toys were in the living room.

Well now that you have shared the "living quarters" of our house, there is a whole seperate floor where I built a business, shared many memories with alot of my friends and customers. I will share that tomorrow. (Isaiah wants to go outside & play) ... then I will also share our "Shelter House" & then the land where we will be building for our new memories.


Tuesday, April 17, 2012

Updates!!

Well my fellow followers..you know if I am quiet on here that means I've been doing ALOT of creating !!! Right ??? I have been MIA for a few days, but be prepared, something good is coming !!

Well I will be sharing LOTS of creating that I & other fellow CTMH peeps have been creating too ! I can't wait to share it with you over the next few days !!! For now .... don't forget the Dotty for You campaign starts today !!! Watch the video below to see the wonderful artwork you can create & then follow me the rest of the week for updates on more beautiful artwork I will feature on this paper !

Just a $35 purchase will get you a 24 pack of paper for only $5 !! So, watch the video, then click below it for my website & place your order today !!! Remember, YOU CAN GET IT FREE if you have a party !! Who wants to party !! ??


Wednesday, April 4, 2012

Dotty For You ...............

Watch below to see the latest news about 2012 National Scrapbooking Month ..... uploaded layouts will be following in the next couple days... be sure to come back to see them !!